Static Site Deployment on the Internet Computer
Deploying a static site to DFINITY's Internet Computer on Fleek is as easy as it is to do so on IPFS, or the Web 2.0 services you know, but don't love much because of their trust-based or centralized approaches.
With our GitHub integration there is no risk of outdated content, or delays. When you push to your repository, Fleek will pick up the changes and update your canister on DFINITY's Internet Computer accordingly.
Had a site on Alpha Mainnet and want to redeploy to Mainnet?
If you utilized the Alpha version of this product, and you deployed a site on Alpha Mainnet, you can redeploy it easily to Mainnet by triggering a new deploy from the Fleek app, or pushing a new commit to the associated GitHub repository linked to Fleek. Fleek will automatically rebuild the site and deploy it to the Internet Computer's Mainnet.
How Does Fleek Host Static Sites on the Internet Computer?
Before getting started, let us break down the flow on what is happening when you upload a site to the Internet Computer through Fleek.
When you first build a site on the Internet Computer (IC) through Fleek (on the site's first deployment), Fleek will create a new canister on the Internet Computer for you, with the website's content/code/files in it. This is done via the DFINITY SDK (view documentation), as Fleek interacts directly with the networks' native APIs.

Once your canister and first deployment is set, and your site is live, Fleek will update the content of that canister upon each deployment automatically. Meaning you will have one assigned front-end canister for each site you push to the DFINITY Internet Computer.
Info
IMPORTANT: At the moment, there is a 2.5GB (approximate) storage limit on IC canisters; This doesn't affect most static websites, but a quick an easy way to bypass this is to host/store media files on IPFS with Fleek! And embed them through the public/open URL we provide. This amount might increase with the Internet Computers continuous development.
This set of tools that are part of the nexus between the current web (Web 2.0) and the next web (Web 3.0) will be progressively replaced. For example, by native support for the IC resolving on applications/websites that could help eliminate the need for bridges.
Other resources: IC Deploy GitHub Action
Aside from our Internet Computer hosting feature, we are working on releasing several resources to simplify development on DFINITY's IC and dev work with canisters, independently of the Fleek platform and its products.
Our team has released the IC Deploy Action, a GitHub Action that anyone can use to integrate GitHub's CI/CD deployments to your canister development pipeline. It wraps DFX commands and uses GitHub secrets so that you can deploy and push changes to canisters on the Internet Computer upon commits to your repository.
This works for any type of canister, not just FE asset canisters, and is meant to help make IC development a little more seamless, just like Fleek's automatic FE hosting on the Internet Computer is.
Deploy a Static Site to the Internet Computer with Fleek
1) Use the Fleek Native GitHub Integration

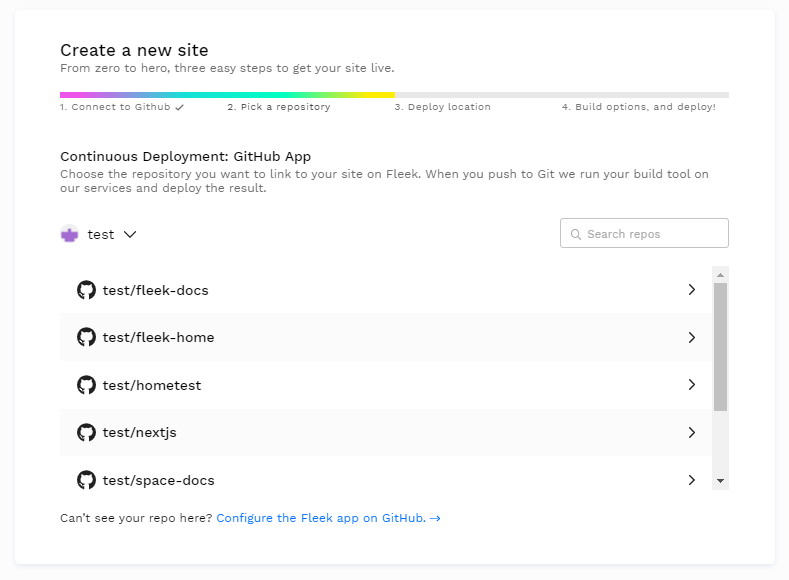
Visit the Hosting tab and add a new site to begin the process. First, you will need to link your GitHub account and define the repositories that Fleek will have access to for you to select from and deploy to the IC.
You will then select the proper repository where your static site is in, and the branch (if multiple are available) that will be used for deploying your site.
You will need to have a repository ready with static site public directory (most Jamstack frameworks are supported), and set the build settings. It is set and forget, so once your site is built and configured, you will benefit from continuous deployments. Just push your changed to the proper branch on GitHub, and done!
2) Select Internet Computer as the Deployment Location

Got a repo and branch ready? Cool! Now, you will have to pick where you want to host your website. Internet Computer, or IPFS. Open the dropdown menu and select Internet Computer and hit next.
Remember that when deploying to the IC, you are deploying to the Internet Computer computational blockchain. This is a decentralized and trustless environment that doesn't depend on Fleek.
IPFS, on the other hand, is a distributed node environment that provides a user-controlled and performant location for sites, but it does depend on Fleek. Their perks and different, and both represent different approaches to Open Web hosting!
3) Configure the Deployment - Build Parameters
Fleek handles build parameters equally across the IC and IPFS. First, it will try to autodetect the site's framework and apply the standard build parameters.
However in some cases you might need to add the parameters manually (or you might want to customize them further). Don't worry if you mistakenly place a wrong parameter, these can be changed both here, and after the deployment in the site's build settings.
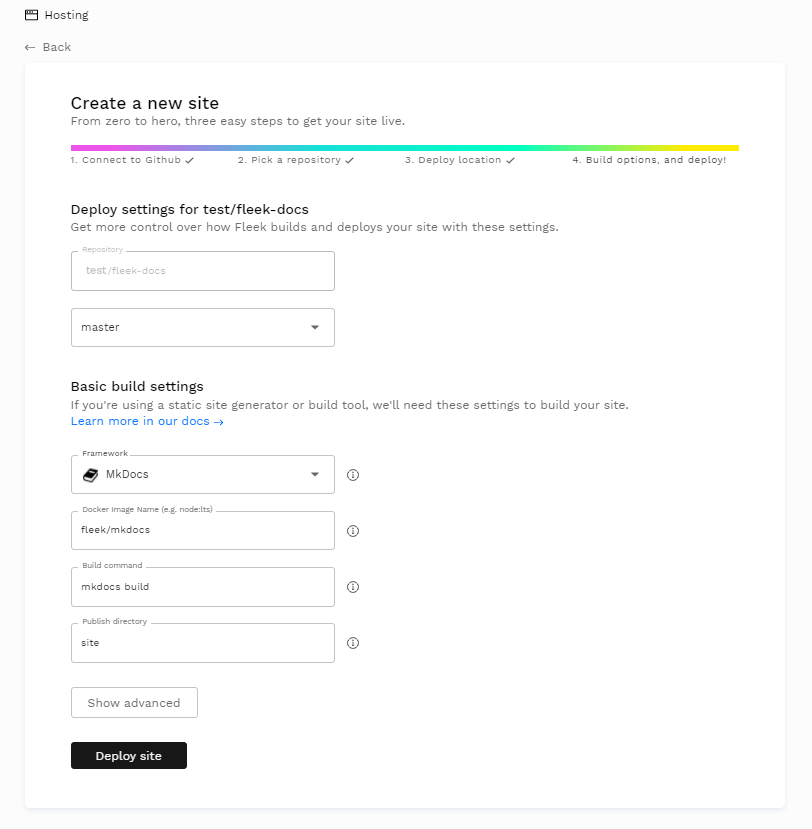
Below are the build parameters which you can modify.
Branch: Right after your Repository, you can select the proper branch for your deployment.Framework: If Fleek doesn't auto-detect the proper framework, you can select one of our automatically supported ones from the list.Docker image: The name of the docker image on docker hub in which your site will be built, defaults tonode:slim. Fleek provides images for many popular frameworks, but you can use any that suits your project.Build command: The commands to execute to build the site. EG:npm install && npm run buildPublish directory: The name of the directory containing theindex.htmlfile of your site after it has been built
Advanced Settings
Environment variables: The values of your environment variables. It is here for example that you might set your environment asproductionSpecify Docker Images: Customize the docker image to fit your own needs/dependencies, or let Fleek auto-detect it
Canister Proxy
With Fleek's transition to the Internet Computer's mainnet, we have now defaulted the canister's resolving through the Internet Computer's main gateway.
Bots, Crawlers, and Other Non-human Requests
To ensure your static sites on the IC are bot-friendly, crawlable by search engines, and show their metadata and link previews (when shared on social, for example), the IC gateway will utilize its proxied solution.
Environment Variables
Environment variables are exactly that: variables that exist on the machine that’s running your build. You can set up any amount of environment variables by clicking the New Variable button.
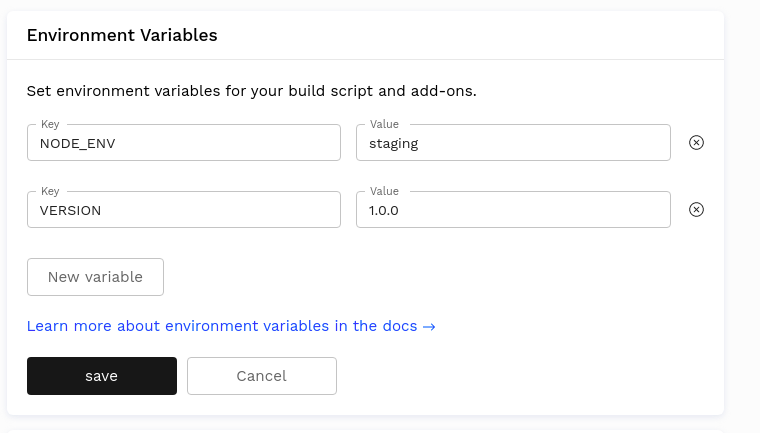
A typical use case is setting up an staging environment. You can do this by adding two sites pointing to the same repository, and then setting up the NODE_ENV variable differently in each site. Then, in your Node.js build script you can check for this variable by doing process.env.NODE_ENV and for example displaying a new feature only if process.env.NODE_ENV === staging so that the feature is only visible in your staging environment. That way you can test your new feature before it reaches all your users.
Docker Images
We run builds inside a Docker container. Fleek will attempt to auto-detect the framework used in the project and fill the Docker Image settings with the appropriate Docker Image. However, any Docker image from Docker Hub can be used as a Docker image.
Fleek's Docker images
We provide Docker images for all the major frameworks such as Gatsby, Hugo, etc... These images can be found on Fleek's official Docker Hub org: https://hub.docker.com/orgs/fleek/repositories
In addition to support for multiple frameworks, Fleek supports variations within each framework, such as support for multiple Node versions. The Node version is specified from the Docker tag. For example, the image fleek/gatsby:node-10 will use the version 10 of Node.js.
If no Node.js version is specified through the Docker tag, the image will use the latest version of Node.js. For example, fleek/gatsby is equivalent to fleek/gatsby:latest which is also the same as fleek/gatsby:node-latest, and they all use the latest Node.js version.
Also, a list of the Docker tags are available for each image on the image page on Docker Hub.
For example, here is the list of Docker tags for the fleek/gatsby image: https://hub.docker.com/repository/docker/fleek/gatsby
Finally, if you wish to see the Dockerfile from which each image is built from, the source code is made available on Github: https://github.com/FleekHQ/site-builder-docker-images
Custom Docker Images
Sometimes, the Fleek Docker image is missing a dependency or two, or maybe you have few dependencies and want to use a leaner Docker image to speed up the build process. In these cases, it makes sense to use a custom Docker image.

Note
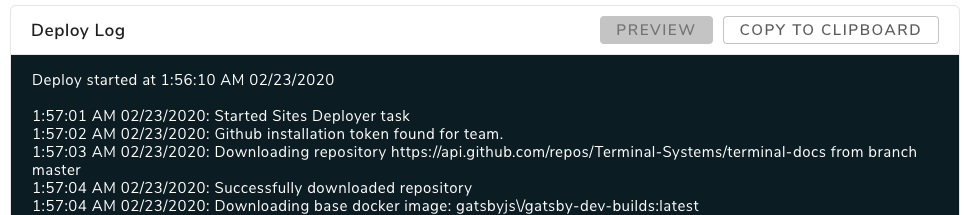
You can see in our build logs which docker image was picked for your build.
To use a custom Docker image, you just need to fill the Docker Image input with a valid Docker name and tag from an image that exists in the Docker Hub. The Docker Hub contains thousands of publicly curated images to choose from. We recommend choosing one of the official packages and making sure the version is compatible with your build settings. Also check that the syntax of your Docker Image input is correct, it should be in the format [name]:[tag].
After the docker image has been selected, “Trigger Deploy” must be clicked in order to build the site using that image as the base.
Some popular options are:
- jekyll/builder for Jekyll
- node:lts for any other node-based environment.
If you can’t find a suitable Docker image for your project, you can always build and publish your own (it’s free!). To do so, head over to the official Docker documentation here.
Common Website Frameworks
When you define the publish directory, if it is not automatically set, you can use this list of popular frameworks as a reference of the usual commands and public directory. You can find more guides on popular frameworks here (hosting tutorials and guides). Frameworks and build settings work exactly the same across IPFS/IC.
All frameworks guides can be applied to both environments, the only difference being the moment you select the deployment location, where in this case you select the Internet Computer.
| Framework | Docker Image | Build Command | Public Directory | Additional documentation |
|---|---|---|---|---|
| Create React App | fleek/create-react-app | yarn && yarn build |
build | Tutorial blog post |
| Gatsby | fleek/gatsby | yarn && gatsby build |
public | Tutorial blog post |
| Hugo | fleek/hugo | yarn && hugo |
public | Tutorial blog post |
| Jekyll | fleek/jekyll | jekyll build |
_site | Tutorial blog post |
| Next JS | fleek/next-js | yarn && yarn build && yarn export |
out | Tutorial blog post |
| Gridsome | fleek/gridsome:node-12 | yarn && yarn build |
dist | |
| Svelte | fleek/svelte | yarn && yarn build |
public | |
| Svelte + Sapper | fleek/svelte | yarn && yarn export |
__sapper__/export | |
| MkDocs | fleek/mkdocs | mkdocs build |
site |
File configuration
Using a .fleek.json configuration file, placed at the root of a project, you can provide options that changes the default build behavior and overrides settings from UI (except secrets).
{
 "build": {
   "image": "node:alpine",
   "command": "npm install && npm run build && echo $SOME_ENV",
   "publicDir": "build",
   "baseDir": "frontend",
   "environment": {
     "SOME_ENV": "Build finished!"
   }
 }
}
All these fields are optional:
imagepublic docker image, default to node:slimcommandno command is executed by defaultbaseDirbuild command is executed in this directory, root directory is used by defaultpublicDirthis directory is uploaded to the Internet Computer,baseDiris used by defaultenvironmentkey/value object of environment variables
If you use baseDir = /frontend and publicDir = /dist, published path is /frontend/dist. If you need to publish directory above or next to your baseDir, you can use relative path publicDir = ../../dist.
Monitoring a deployment
Fleek offers a host of logging tools to aid in monitoring your site.
Deploy Logs
The deploy log includes all of the standard output which comes from running your build as well as Fleek-specific information about dependency caching, Fleek configuration file processing, and more.

Deploy Summaries
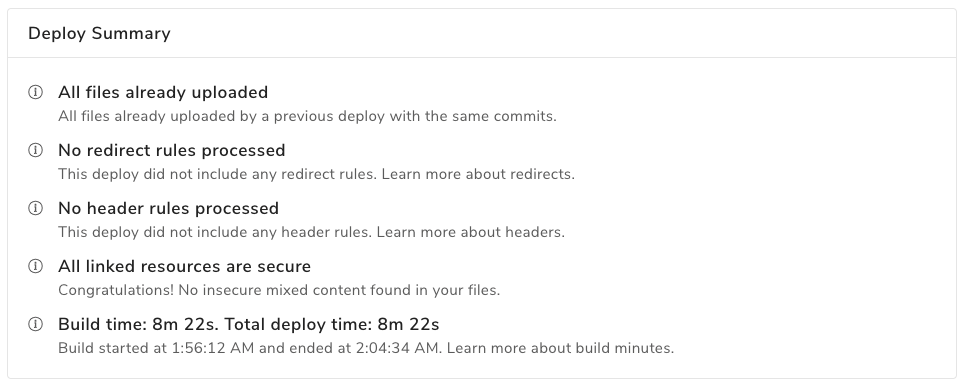
You can find a deploy summary on the detail page of any successful deploy, right above the deploy log. It allows you to quickly identify your deploy status and refer to the details in the log based on different types of information.
The summary contains details such as the presence of Redirect rules and Header rules.
Previewing a deployment
Deploy previews
Deploy previews allow you to preview a deployment before pushing it to production. You can safely view what your site will look like before you merge the pull request.
It should come in handy when you want to make sure that everything is in order with the changes you want to make and avoid bad surprises due to unfortunate oversights.
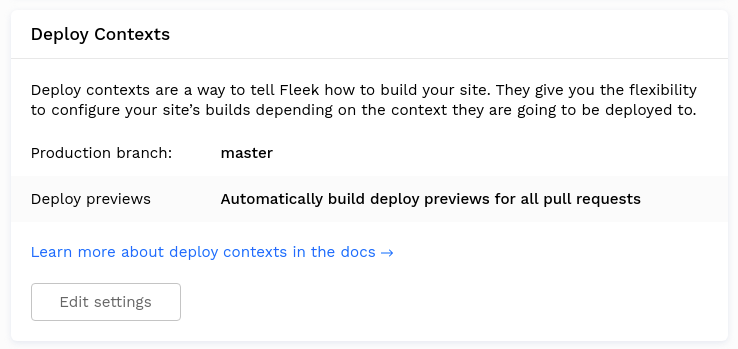
Activating deploy previews
The feature must first be activated since it is deactivated by default. You can do so by going to the site's settings, clicking on Build & Deploy and interacting with the Deploy Contexts box.
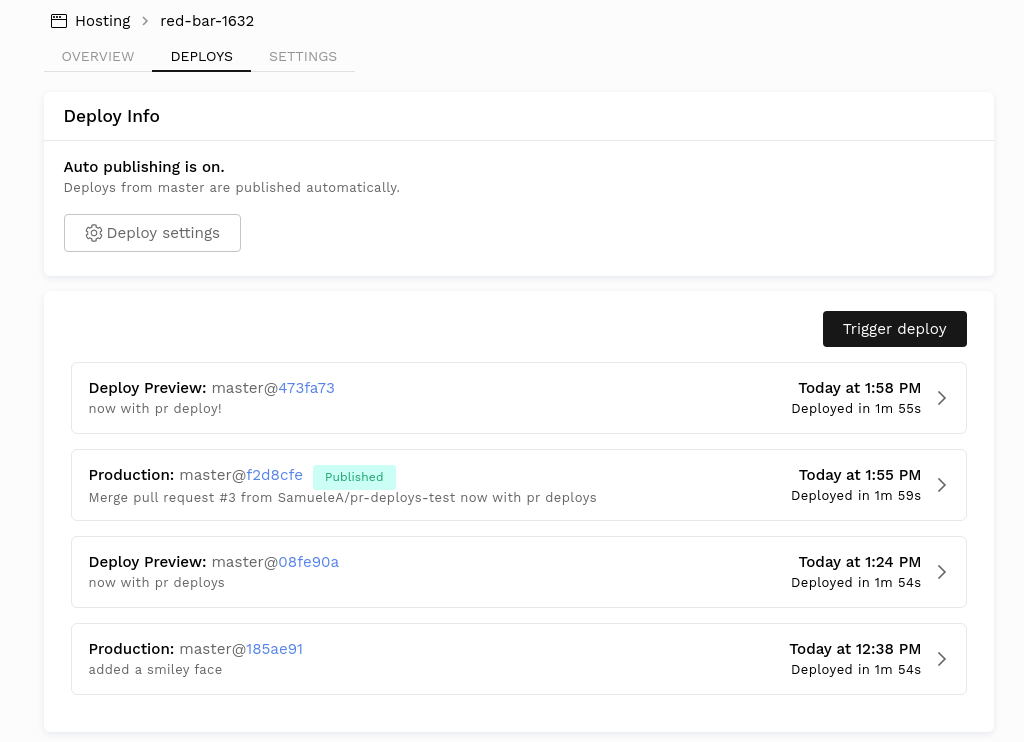
Viewing deploy previews
To start a deploy preview, simply create a pull request to your production branch. The deploy preview will appear in the list of deploys of the site.
Click on the deploy tagged Deploy Preview to view it!
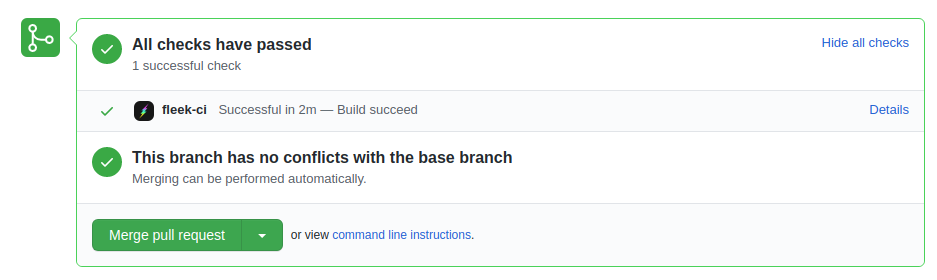
In addition, you are able to view the deploy preview right from the github page of your pull request. Very handy for developers wanting to see the changes resulting from a pull request!
Testing deployments locally
We're using docker containers to execute your builds, so you can test them locally with Docker. Here's a sample docker-compose.yml, we're using Verdaccio as a local npm proxy (it's not supported for production builds).
version: '3.7'
services:
  verdaccio:
    container_name: verdaccio
    image: verdaccio/verdaccio
    ports:
      - "4873:4873"

  app:
    image: $IMAGE
    command: sh -c 'npm set registry http://verdaccio:4873 && $BUILD_COMMAND'
    working_dir: /workspace/$BASE_DIR
    environment: $ENVIRONMENT
    volumes:
      - './path/to/app:/workspace/$BASE_DIR'
Example of Gatsby Site Testing
You can execute the configuration below with command docker-compose run -it --rm app.
version: '3.7'
services:
  verdaccio:
    container_name: verdaccio
    image: verdaccio/verdaccio
    ports:
      - "4873:4873"

  app:
    image: fleek/gatsby
    command: sh -c 'npm set registry http://verdaccio:4873 && npm install && npm run build'
    working_dir: /workspace
    volumes:
      - './path/to/app:/workspace'
Deleting a deployment
Deleting a Site

Deleting a site is an irreversible action so proceed with caution.
To delete a site, go to the settings of the site and navigate to General > Danger Zone. A modal will then appear with a warning and instructions to delete the site.
Purging Site Cache
How to Manually Purge Cache
If your website is not reflecting the latest changes, you might have a cache-refresh issue. A previous cache layer might be being held by BunnyCDN, and therefore you’re seeing the website from the cache layer, not the most updated version.
Fortunately, purging the cache manually fixes this! and you can do it right from the Fleek app if needed.
Under the hosting section in Fleek, find the affected site, and visit the Settings section in the sites details. Navigate to Build and deploy sub-menu, and find the site management and Purge Cache feature.
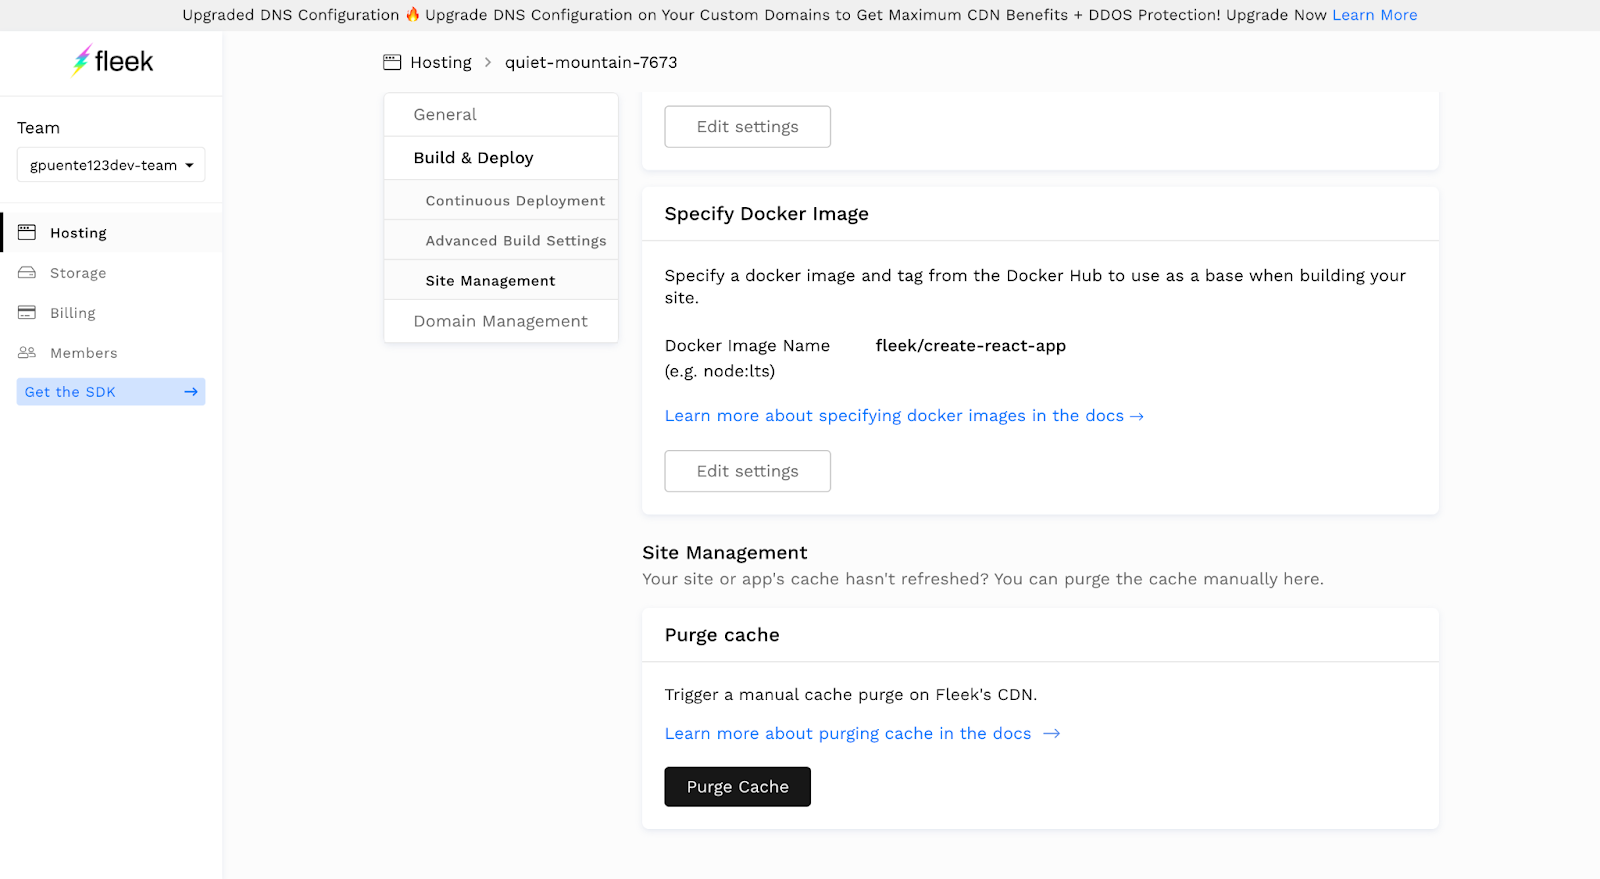
All it takes is a click of the button! Fleek will trigger a manual cache purge on BunnyCDN, and after a minute, you can recheck that your site is displaying the latest cache version.